初心者でもできる!ArmadilloでSoftEtherVPN(Client編)
概要
- マイコン(Armadillo)でSoftEtherVPNのClientを作成する
前提条件
- root権限で実行してください(デフォルトでは、
- インターネットに出られる状態になっていること
- ssh接続ができるようになっていること(
apt-get -y install sshでinstallできます) - USBメモリの用意
- あきらめない心
Armadilloのkernelの確認
CONFIG_TUN=yになっているかチェックする。- =yの時は、SoftEtherのインストール可能
- =y以外の時は、Linuxのカーネルを変更する必要がある。
- 上記の場合は、Armadillo G3Lでのtunデバイス有効化手順とかArmadillo開発者サイト 第22章Howtoなどを参照いただければ幸せになれそうです。
確認方法 下記のコマンドで
CONFIG_TUN=yが返ってくるかチェックする
zcat /proc/config.gz | grep "CONFIG_TUN="
準備
SoftEtherClientをダウンロードしてきます。
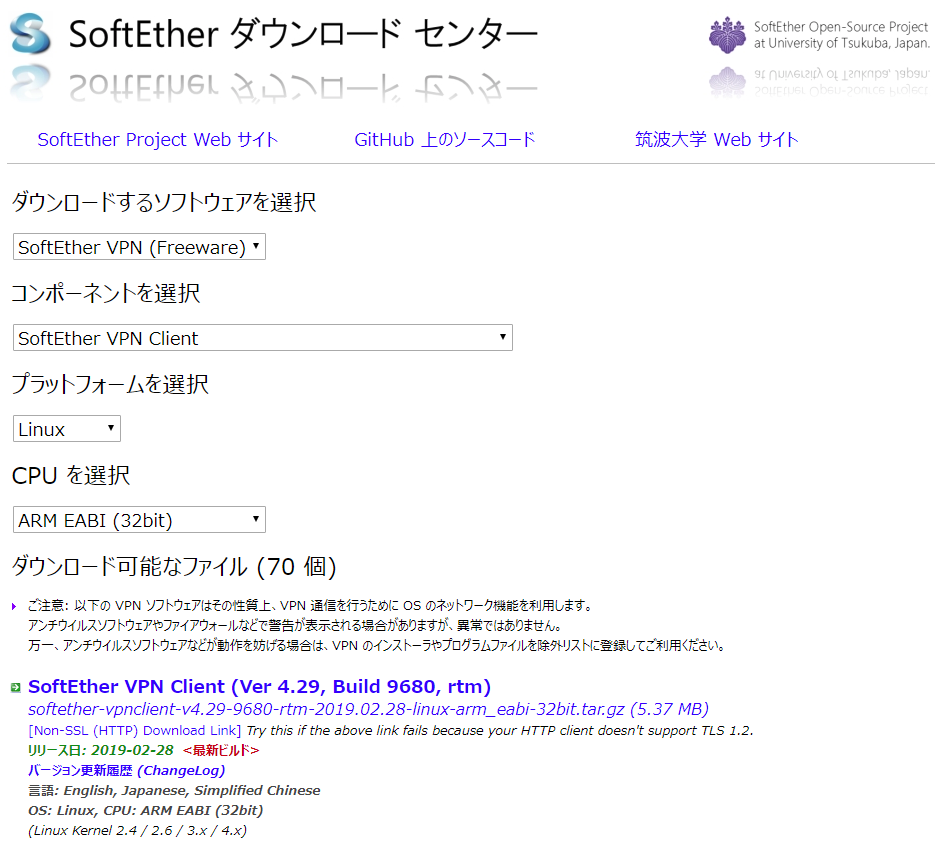
上記に示したファイルをUSBメモリに格納し、Armadilloに挿入します。
- 挿入後は、下記のコマンドで/mnt以下にUSBメモリをマウントし、Armadillo内のvpnフォルダ以下にコピーします。
mount -t vfat /dev/sda1 /mnt
mkdir /home/atmark/vpn
cp /mnt/softether*** /home/atmark/vpn
cd /home/atmark/vpn
SoftEtherのinstall
- /home/atmark/vpnフォルダにいると思いますので、下記のコマンドを実行し、SoftEtherを展開します。
- Linux へのインストールと初期設定を参考にしています。(ただし、本URLはサーバーのインストールのため適宜Clientに読み替えていきます。)
tar xzvf softether***
- 次に、vpnclientフォルダに移動してmakeを実行します。
cd vpnclient/
make

Do you want to read the License Agreement for this software ?
1. Yes
2. No
Please choose one of above number:
1

Did you read and understand the License Agreement ?
(If you couldn't read above text, Please read License_ReadMe.txt
file with any text editor.)
1. Yes
2. No
Please choose one of above number:
1

Did you agree the License Agreement ?
1. Agree
2. Do Not Agree
Please choose one of above number:
1
- 上記が終了後、vpnclientフォルダに移動します
- 移動後、vpnclientをスタートさせ、設定を行います。
cd vpnclient/
./vpnclient start
./vpncmd
root@armadillo:/home/atmark/vpn/vpnclient
root@armadillo:./vpncmd

vpncmd command - SoftEther VPN Command Line Management Utility
SoftEther VPN Command Line Management Utility (vpncmd command)
Version 4.19 Build 9599   (English)
Compiled 2015/10/19 20:28:20 by yagi at pc30
Copyright (c) SoftEther VPN Project. All Rights Reserved.

By using vpncmd program, the following can be achieved.

1. Management of VPN Server or VPN Bridge
2. Management of VPN Client
3. Use of VPN Tools (certificate creation and Network Traffic Speed Test Tool)

Select 1, 2 or 3: 2 #2番を選択します

Specify the host name or IP address of the computer that the destination VPN Cli                                     ent is operating on.
If nothing is input and Enter is pressed, connection will be made to localhost (                                     this computer).
Hostname of IP Address of Destination: # 何も入力せずにEnter

Connected to VPN Client "localhost".

VPN Client>NicCreate #仮想NICを作成します。
NicCreate command - Create New Virtual Network Adapter
Virtual Network Adapter Name: azure_vpn # 今回はAzureにSoftEtherServerを立てた想定でこのような名前にしています。

The command completed successfully.

VPN Client>AccountCreate # Accountを作成します。
AccountCreate command - Create New VPN Connection Setting
Name of VPN Connection Setting: [Account名] # Account名を任意の文字列で作成

Destination VPN Server Host Name and Port Number:
[VPNServer名:port] # VPNのサーバー名とポートを指定します。

Destination Virtual Hub Name: AzureVPN # 仮想HUBの名称を指定します。

Connecting User Name: [User名] # サーバー側で設定したUser名を入力します

Used Virtual Network Adapter Name: azure_vpn #前段で作成したNICの名称を入れます。

The command completed successfully..

VPN Client>AccountPasswordSet #Accountのパスワードを設定します。
AccountPasswordSet command - Set User Authentication Type of VPN Connection Sett                                     ing to Password Authentication
Name of VPN Connection Setting: [Account名] # 前段で設定したAccount名を入力します

Please enter the password. To cancel press the Ctrl+D key.

Password: [password] # 任意のパスワードを設定します。
Confirm input: [password]


Specify standard or radius: standard # standardを設定します。

The command completed successfully.

VPN Client>AccountConnect # 次にどのAccountを接続するかを設定します。
AccountConnect command - Start Connection to VPN Server using VPN Connection Set                                     ting
Name of VPN Connection Setting: [Account名] # Account名を入力します

The command completed successfully.

VPN Client>accountlist
AccountList command - Get List of VPN Connection Settings
Item                        |Value
----------------------------+-------------------------------------------------------------------
VPN Connection Setting Name |[Account名]
Status                      |Connected
VPN Server Hostname         |[VPNServer名:port] (Direct TCP/IP Connection)
Virtual Hub                 |AzureVPN
Virtual Network Adapter Name|azure_vpn
The command completed successfully.

VPN Client>accountstartupset # スタート時にどのAccountを接続するか設定します。
AccountStartupSet command - Set VPN Connection Setting as Startup Connection
Name of VPN Connection Setting: [Account名]
- また、/etc/init.d/vpnclientにvpnclient起動スクリプトを作成した。
chmod 755 vpnclientで実行権限も渡しておく
#!/bin/sh
#
# chkconfig: 2345 99 01
# description: SoftEther VPN Client

DAEMON=/home/atmark/vpn/vpnclient/vpnclient
LOCK=/var/lock/subsys/vpnclient

test -x $DAEMON || exit 0

case "$1" in
  start)
    $DAEMON start
    touch $LOCK
    ;;
  stop)
    $DAEMON stop
    rm $LOCK
    ;;
  restart)
    $DAEMON stop
    sleep 3
    $DAEMON start
    ;;
  *)
    echo "Usage: $0 {start|stop|restart}"
    exit 1
esac

sleep 5
ip address add 192.168.1.1/24 brd 192.168.1.255 dev vpn_azure_vpn

exit 0
- また、rc.localには下記のように入力し、vpnclient起動後固定IPを振るようにした。
#!/bin/sh
#
# rc.local
#
# This script is executed at the end of each multiuser runlevel.
# Make sure that the script will "exit 0" on success or any other
# value on error.
#
# In order to enable or disable this script just change the execution
# bits.
#
# By default this script does nothing.
HUB_RESET="/sys/devices/soc/30800000.aips-bus/30a50000.i2c/i2c-3/3-0008/USB3503_
RESET/value"
reset_hub()
{
        echo 0 > $HUB_RESET
        sleep 0.1
        echo 1 > $HUB_RESET
}

HUB_ID="0424:3503"
lsusb -d $HUB_ID > /dev/null 2>&1
if [ $? -ne 0 ]; then
        reset_hub
fi

/etc/init.d/vpnclient start

sleep 5
ip address add 192.168.1.1/24 brd 192.168.1.255 dev vpn_azure_vpn

exit 0
以上で設定は終わりです。 これで、Armadillo起動時に自動的にSoftEtherが立ち上がります。
まとめ
線形計画法 + pulp のハンズオン
線形計画法の概要
線型計画法(せんけいけいかくほう LP; linear programming )は、数理計画法において、いくつかの1次不等式および1次等式を満たす変数の値の中で、ある1次式を最大化または最小化する値を求める方法である。線形計画法の対象となる最適化問題を線型計画問題という。 出典:[Wikipedia]
目的の変数に対して、複数の1次不等式や1次等式で制約を設けて最も大きい(小さい)目的変数を求めるやり方
ハンズオン
問題
example1
- 下記の制約条件をもとに、利益を最大化するにはどうすればよいか
- 工程1は1日7時間まで
- 工程2は1日14時間まで
| table | 物品A | 物品B |
|---|---|---|
| 工程1 | 2時間 | 2時間 |
| 工程2 | 3時間 | 5時間 |
| 利益 | 4千円 | 5千円 |
ソースコード
from pulp import *
# 問題オブジェクトを生成
prob = LpProblem(name='整数計画法exapmle1',sense=LpMaximize)

# 変数設定
x1 = LpVariable('x1',lowBound=0)
x2 = LpVariable('x2',lowBound=0)

# 目的変数の設定
prob += 4*x1 + 5*x2
# 制約条件設定
prob += 2*x1 + 2*x2 <= 7,'ineq1'
prob += 3*x1 + 5*x2 <= 14,'ineq2'

# 問題出力
print('-------問題情報出力-------')
print(prob)

# 解を求める
prob.solve()

# どういう状態で解けたか
print('-------解情報-------')
print(LpStatus[prob.status])

# 最適値出力
print('-------最適値出力-------')
print('Optimal Value ={}'.format(value(prob.objective)))
# 最適解出力
print('-------最適解出力-------')
for val in prob.variables():
    print('{}={}'.format(val.name,value(val)))
結果
-------問題情報出力-------
整数計画法exapmle1:
MAXIMIZE
4*x1 + 5*x2 + 0
SUBJECT TO
ineq1: 2 x1 + 2 x2 <= 7

ineq2: 3 x1 + 5 x2 <= 14

VARIABLES
x1 Continuous
x2 Continuous

-------解情報-------
Optimal
-------最適値出力-------
Optimal Value =15.75
-------最適解出力-------
x1=1.75
x2=1.75
まとめ
- 簡単な例はなんとなくわかった。
- 社会問題では立式するのが大変そう。
- 混合整数線形計画もやりたい。
参考
PyCaretで主成分分析ハンズオン【正規化+可視化(plotly)】メモ
概要
- PyCaretでPCAを行いました。(ハイパーパラメータ等の最適化はしていません)
- とある電力量データでPCAを行いました。
ソースコード
- 自前のデータ整形ソースコード(汚い):13行
import pandas as pd
def load_sampledata():
    data = pd.read_csv(r'pycaret_sample.csv',
            encoding='shift-jis',
            engine='python',
            index_col=[0],
            parse_dates=[0])

    data = data.resample('h').sum()
    data['hour'] = data.index.hour
    data['date'] = data.index.strftime('%Y-%m-%d (%a)')
    dataset = data.pivot(index='hour',columns='date',values='電力量')
    dataset = dataset.T.reset_index()
    return dataset
- PyCaretのセットアップ:2行
from pycaret.clustering import *
clu = setup(data = load_sampledata(),normalize=True)
setupした内容を確認できる

PyCaretのモデル作成+プロット作成:2行
# creating a model
hclust = create_model('hclust')
# plotting a model
plot_model(hclust,plot='cluster',feature='date')
- 2行でPCAと可視化までできる。

まとめ
- PyCaretすごい。
- これで書き始めるとラッパーなしで書けなくなりそう。
- チューニングもできるし、すごい早さで書ける。すごい。
Python_特殊メソッド__str__
概要
- datetime.date(2019,5,21)をインスタンス化した後に、print(instance)で文字列が返ってくるのが気になった。
コード
class testclass:
    def __init__(self,val1,val2,val3):
        self.year = val1
        self.month = val2
        self.day = val3

    def __str__(self):
        print('OK')
        return str(self.year) + '-' + str(self.month) + '-' + str(self.day)

aa = testclass(2019,11,1)

print(aa)
>> 2019-11-1
賢くなった点
__init__は割とよく使うけど、__str__を初めて使った。- 今までいちいち関数にprint書いてたけど、書かなくてよくなった。
【備忘録】pythonを使ってftp接続し、最新フォルダを取得する
概要
- ftp接続し、最新フォルダを取得する。
覚書
- ftplibでftp接続しフォルダにアクセスする。
- フォルダは自動生成され、フォルダ名称はint型の数値でインクリメントされたものになる。
- ファイルとフォルダの判断は、.(ピリオド)の有無で行っている。
Code
- 最新フォルダを取得するまで
from ftplib import *

ftp = FTP('192.168.1.1')
ftp.login()
ftp.cwd('LOGGING/FOLDER')

def select_folder():
    # カレントディレクトリからフォルダを探し、folder_listに格納する
    folder_list = []
    for object_name in ftp.nlst():
        if '.' in object_name:
            print('{}はファイルです。'.format(object_name))
        else:
            print('{}はフォルダです。'.format(object_name))
            folder_list.append(object_name)
        accsess_folder = 0

    # folder_listをint型に変更し、数値が最も大きいものをアクセスするフォルダとしてreturnする。
    for folder_name in folder_list:
        print(int(folder_name))
        if int(accsess_folder) < int(folder_name):
            accsess_folder =folder_name

    print('最新のフォルダは{}です。'.format(accsess_folder))

    return accsess_folder

ftp.cwd(select_folder())
懸念点
- エラー処理全くなし
- フォルダ数が増えたときにどうしよう
なぜ作ったか
- 会社のおじさんにこういうのできないって言われたから
- 30minで作ったけど、ここからおじさんは改良できるんだろうか
RandomForest
概要
- ランダムフォレストとは、弱学習器の決定木たくさん使って、単体の決定木より予測精度を向上させましょうというもの
- 回帰でも分類でもどちらでも使用できる
- 弱学習器を重ねる方法は、XGBoostとかLGBMとかもこのアルゴリズムらしい。
昔に書いたもの
- とある学会で、エネルギーデータを予測するのにとりあえずRandomForestがいいよと聞いてやってみた結果
- 実際、説明変数を大量に突っ込めばよい結果が生まれるわけではないのだけれど、学会で自信満々に発表されてるのをみてちょっと驚いた。
とはいえ・・・
- 僕自身もまだふんわりとしかわかっていない
- ツールとして使えるのはもちろんのこと本質がわかっていないとなぜこのアルゴリズムを選定したのかという明確な回答ができないから勉強あるのみ
賢くなった点
書いてて思ったけど、まだふんわりしているからもう少し掘り下げて明日も書こう。
